
How to Fix NES Blinking Red Light
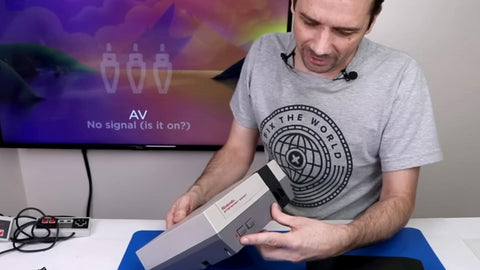
So you finally got your hands on that old school NES system you’ve always wanted, but before you were able to play any of your favorite games it gave you a blinking red light on the console, or a glitchy/static screen. What gives? You might’ve heard that it has to do with the “72-Pin Connector” but might have no idea how to fix it.
Thankfully this is a fairly easy fix that doesn’t require much experience. You just need some basic tools and a good tutorial, which we will include here in this article. Keep on reading if you want to learn why this happens, how to fix it, and some good resources to provide extra help.
Most Common Causes
There are a couple of things that can cause this problem to happen with the NES system. These are the most common:
- Bad game cartridges: Sometimes the game cartridge itself is the issue. This can happen when the game cartridge has damaged and/or dirty pins on the inside, which makes it so that the game can’t connect properly to the console.
- Dirty pins: The pins inside of the NES may be dirty or corroded which can also cause this connection issue. The dirty buildup on the pins makes it difficult to connect with the pins inside of the game cartridge.
- Bent pins: Similar to having dirty pins, having bent pins inside of the NES will cause connection issues. When the pins are out of place they may not be contacting the pins on the game cartridge correctly.
Initial Inspection
The first thing you should do before taking the console apart is to inspect the inside with a flashlight to see what’s going on in there. All you need to do is open up the front hatch and shine the flashlight in so you can see the pins inside. Do they look dirty, bent, or full of debris? If any of those are the case, then you will need to continue on to the next step.

Taking Apart For Further Inspection, Cleaning, and Repair
The best thing to do at this point is to take apart the console and clean the pins inside the NES. This video shows exactly how you can do that:
Cleaning The Pins
For those who prefer written instructions, you can follow along with the steps below.
What you’ll need
- A long Phillips screwdriver
- A multimeter
Fluke Digital multimeter (Amazon paid link) - A dental pick or a bent safety pin
Set of 4 dental picks (Amazon paid link) - 1000 grit sandpaper
- Metal polisher
- Isopropyl alcohol
99% Isopropyl alcohol (Amazon paid link) - Cotton swabs
- Side cutters
Taking the console apart
- Take out the 6 screws on the bottom with the long Phillips screwdriver.
- Remove the 6 screws on the big black plastic piece.
- Remove the screws from the motherboard and surrounding areas so you can remove the inner piece.
- Flip the entire inner piece over and disconnect the light blue connector and the light green connector.
- Remove the metal plate.
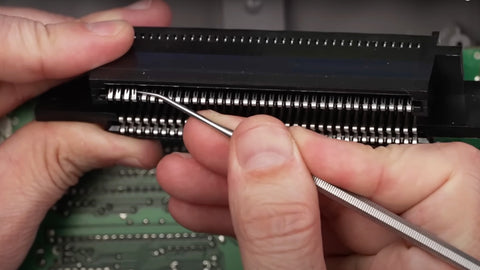
- Remove the 72-pin connector by simply pulling it off of the motherboard.
Cleaning the 72-pin connector
- Use a multimeter to test each pin on the 72-pin connector to make sure there are no breaks in the connections.
- Bend each pin up a tiny bit with a dental pick or a bent safety pin.
- Use some 1000 grit sandpaper and gently sand the surface of the contacts to remove any oxidation or dirt.
- Place the 72-pin connector into a pot of boiling water and let it boil for 30 minutes. Once the time is up, set it somewhere to dry until it’s completely free of moisture.
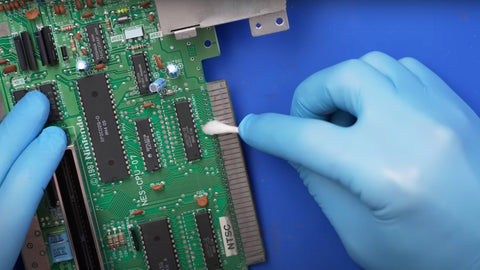
Cleaning the motherboard pins
- Use the 1000 grit sandpaper to gently sand the top and the bottom of the pins on the motherboard to remove oxidation and dirt.
- Use metal polisher to polish the pins.
- Clean off the pins with IPA and a cotton swab until the cotton swabs come off clean.
Putting it back together
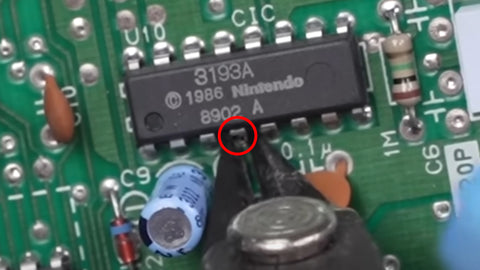
- Carefully disconnect the lockout pin on the Nintendo chip with side cutters. This is what you’ll be looking for:
- Push the 72-pin connector back onto the pins on the motherboard. There will be resistance, so you might need to push hard.
- Install and reassemble everything the reverse of how it was taken apart.
Fixing It Yourself Vs Replacing It
It’s worth mentioning that it’s usually more worth it to fix the 72-pin connector yourself rather than replacing it with a 3rd party connector. There are several reasons for this. One reason is because you will be saving money by doing it yourself, and also avoid the hassle of having to wait for the part to arrive.
Another, sometimes more significant reason, is that most 3rd party 72-pin connectors are not as good of quality as the original. The pins in them are usually weaker so they bend and wear out easier. Because of this it usually works a lot better to clean and repair the original connector.
Additional Help
If you’re still having trouble with getting your NES to work, or if you have broken pins, issues on the board, etc., we have some resources that can help. Check out the TronicsFix Forum where you can see thousands of posts about various consoles and topics, as well as our TronicsFix YouTube Channel which has a plethora of videos to look at.
About the Author
 Kirstyn Bahnmiller is a writer, graphic designer, and video editor for TronicsFix who loves to share her ideas and creativity with the world. In her off time you will find her working on various crafts, making digital art, taking photos, and cooking delicious recipes she found online.