Xbox One X No Signal/Black Screen of Death Repair
No signal issues are by far the most common Xbox One X problem we've seen. If you're experiencing this problem keep reading to find out what causes no signal issues and what to do about them; which might mean a DIY fix or finding someone who can do the repair for you. Let’s jump right in…
Xbox One X No Signal Issues
The Xbox One X Black Screen of Death or No Signal issue can appear in a couple of different ways:
- When the console is connected to the display the screen will show as black with no picture or possibly black that fades to blue and then back to black.
- When the console is connected to the display the screen will show a message saying “Game console (is it on?)” or something similar that shows the console is not connecting to the tv.

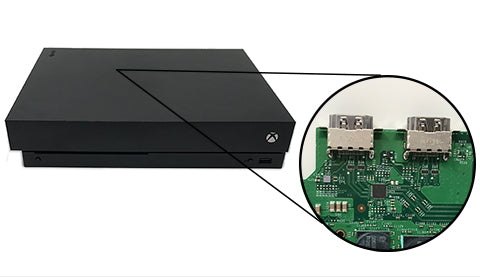
This problem is most commonly caused by a faulty hard drive or by an HDMI issue with either the HDMI port being damaged or one of the related chips on the motherboard not working correctly. However, the problem can also be caused by a damaged or dirty HDMI cord so you'll want to follow the steps below first before trying to repair the console itself.
If your console is not connecting or has no signal you should try the following steps first:
- Check that your HDMI cord is fully plugged into both the TV and the console.
- Inspect the HDMI cord at both ends for damage or dirt and clean it carefully if needed.
- Try using a different HDMI cord you know works OR, if you only have one cord, try plugging that HDMI cord in a different console to see if it works.
- Inspect the HDMI port to see if it is dirty or has anything stuck in it and clean out the port gently as needed.
- Check that the HDMI port is not loose.
If you've followed the steps above and your console still is not working correctly and has no signal, it will likely need to have the hard drive replaced OR one of the HDMI components.
The process of testing the hard drive and HDMI components is advanced and if you don’t feel comfortable with opening up your Xbox One X console and don't have access to the tools and parts required, it might be better to let an expert do it for you. However, a basic explanation of the process is below and also includes links to a YouTube video with more information if you are interested.
Xbox One X Hard Drive Testing
First, remove the top cover of the Xbox by removing the two screws in the back then the long screws from the case. Next remove the ribbon cable before removing the bottom cover. Continue removing screws until you are able to lift the power board and top plate off.
Pull the disc drive up and out of the way so you can get to the hard drive. Carefully disconnect the hard drive cable from the motherboard before removing the hard drive from the console. Remove the hard drive connector from the motherboard and then set the hard drive to the side. Connect a known good hard drive to the motherboard and set it back in the console.
Finally, hook the power button back on to the console and then connect it back up to the TV. Turn the console on to see if the TV is now getting the signal as it should. (Please note: if the hard drive has not had the Xbox software installed on it the display will show an error.)
Check out this YouTube video where I show how I take the console apart: https://youtu.be/aSwm0ZFRmwM?t=52 and how I test the hard drive: https://youtu.be/aSwm0ZFRmwM?t=169
Xbox One X HDMI Component Testing
To test the HDMI components the motherboard needs to be removed, which requires basically disassembling all the other components. Start by removing the disc drive followed by the fan, the power supply, and the hard drive. Next, remove the 4 screws on the bottom metal case and lift the motherboard out. After that, you can remove the X clamp and heat sink to see the HDMI port and components.
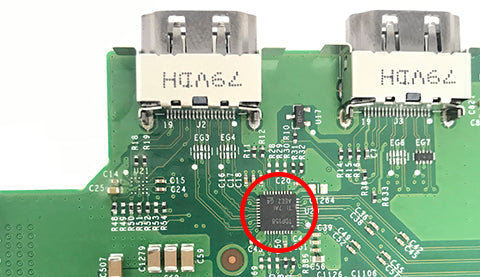
Check the HDMI port to make sure it is not loose and that none of the pins that connect it to the motherboard are loose. Also, check for any noticeable liquid damage.
If everything looks fine the next step is to replace the retimer chip. It's also a good idea to check the HDMI components for any shorts.
Once that's all done it's time to replace the thermal paste and put the console back together enough to test it.
Check out this YouTube video to see how I remove the motherboard and replace the retimer chip: https://youtu.be/aSwm0ZFRmwM?t=253.
ShaneFix Repairs
As mentioned above, the process of testing the hard drive and HDMI components is advanced and if you don’t feel comfortable with opening up your Xbox One X console and don't have access to the tools and parts required, it might be better to let an expert do it for you.
ShaneFix will help you get all of your Xbox One X display issues fixed right away!
Xbox One X HDMI Repair Video
Wrap Up
Hopefully, we helped explain why your Xbox One X doesn't have a signal. Now you should know some basic things you can do to fix the problem and also know when it's time to get help from a repair expert.
About the Author: Jessica Porter